1. Operating Overview
Business Management System is an all-in-one Enterprise Resource Planning (ERP) solution designed for Kenyan businesses to streamline operations, manage workforce, and track financial performance in a unified digital workspace.
1.1 Core Objectives
- Centralized Control: Managing HR, Finance, and Inventory from a single dashboard to eliminate data silos.
- Financial Transparency: Real-time tracking of sales, expenses, and cash flow across multiple bank accounts and mobile money platforms.
- Workforce Productivity: Automating attendance tracking and payroll processing to reduce manual administrative overhead.
2. Access & Security Procedures
The system employs enterprise-grade security including Multi-Factor Authentication (MFA).
2.1 Standard Login Pipeline
Credentials
Open the app and enter your business email and password on the login screen.
Identity Verification (MFA)
If MFA is required for your account, a verification dialog will appear. The system will automatically send a 6-digit code to your email inbox.
Code Entry
Input the 6-digit code from your email into the verification field and click "Verify". On successful verification, you will gain access to the dashboard.
3. Dashboard & Core Modules
The system utilizes a Dynamic User Interface. The modules and features you see in the sidebar and dashboard are automatically filtered based on your assigned User Role.
3.1 Role-Specific Interfaces
- HR Administrators: Will see a focused interface centered on employee records, attendance monitoring, and payroll processing. Their view is optimized for workforce management.
- Sales Attendants: Will be redirected to a streamlined POS Interface. This view is optimized for rapid checkout and barcode scanning, hiding administrative financials and HR data for security and performance.
- Inventory Managers: See modules related to stock tracking, arrivals, and low-stock management.
3.2 Core Module Directory (Full Access View)
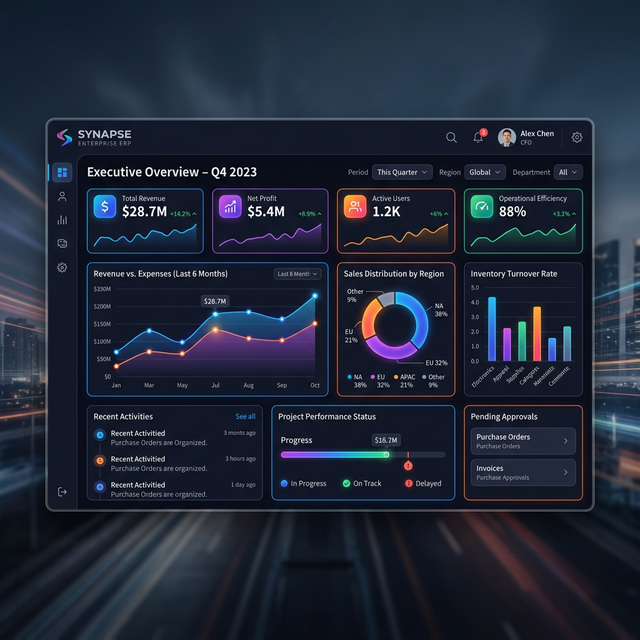
- Dashboard: Real-time status report of business performance and recent activities.
- POS / Sales: Conduct retail sales, scan barcodes, and generate receipts.
- Inventory: Real-time stock tracking, arrivals, and low-stock alerts.
- Procurement: Vendor management, purchase orders, and supply chain tracking.
- Human Resources: Employee records, attendance, and automated payroll.
- Financials: General ledger, invoicing, expense tracking, and P&L reports.
- Users: Role-based access control for your business team.
- Settings: Configure company profiles, tax rates, and system preferences.
4. HR & Payroll Management
Automate your human resource workflows from recruitment to payroll.
- Employee Directory: Maintain comprehensive digital records for all staff.
- Attendance Tracking: Monitor clock-ins and outs with support for biometric site integration.
- Payroll Processing: Generate payslips automatically with pre-calculated statutory deductions (PAYE, NSSF, NHIF/SHIF).
5. Financial Management & Banking
The Financial module is the "Accounting Hub" of the system. Access it via Sidebar > Financials. Once inside, you can navigate between sub-modules using the top navigation bar.
5.1 Banking Operations
Navigation: Sidebar > Financials > Banking (Top Tab)
The Banking sub-module features its own internal sidebar for specialized views:
Registering a New Bank
1. Navigate to Banking > Banks.
2. Click the "+ Add Bank" button in the top
right.
3. In the dialog, enter the Bank Name (e.g.
Equity Bank) and a brief Description.
4. Click "Register Bank". The bank will now
appear in your grid.
Creating Bank Accounts
A single "Bank" can have multiple accounts (Current,
Savings, KES, USD).
1. Navigate to Banking > Accounts.
2. Click "+ Add Account".
3. Select the parent Bank, enter the
Account Name, Number, and
Currency.
4. Input the Initial Balance to sync with
your actual bank statement.
Processing Transactions
Navigate to Banking > Transactions. Click "Process Transaction" to record manual bank entries like interest earned, bank charges, or tax withholdings.
5.2 Mobile Money (Tills & Paybills)
Navigation: Sidebar > Financials > Till/Paybill (Top Tab)
Manage your digital cash collections across M-Pesa, Airtel Money, and more.
- Adding a Till: Select the "Tills" tab and click "Add Till". Enter the Till Name, Number (5-7 digits), and Provider.
- Adding a Paybill: Select "Paybills" and click "Add Paybill". Provide the Business Number and Account Name.
To move money from a Till to your Bank Account:
1. Locate the Till in the list.
2. Click the three-dot menu (⋮).
3. Select "Transfer to Bank".
4. Choose the destination bank account and enter the amount. The system will automatically create balancing entries in both ledgers.
5.3 Cashier Tills & Petty Cash
This is managed via the POS and Shift Management modules. Every shift starts with a "Float" allocation and ends with a "Cash Up" audit, ensuring cashier accountability.
5.4 Invoicing & Expenses
- Sales/Invoices: Tracked under Financials > Sales. View age summaries of unpaid invoices.
- Expenses: Tracked under Financials > Expenses. Ensure every expense is mapped to a specific department or category for accurate reporting.
6. Inventory & Supply Chain
Real-time visibility into your stock levels across multiple locations.
- Stock Tracking: Real-time updates as sales are made or shipments arrive.
- Low-Stock Alerts: Automated notifications when items hit reorder points.
- Procurement: Manage vendors and generate Purchase Orders (PO) directly from the system.
7. Point of Sale (POS)
Fast, reliable retail transactions for your physical outlets, optimized for both touchscreen and keyboard operations.
- Barcode Operations: Rapid product lookups and checkout using standard laser or 2D scanners.
- Multi-Method Payments: Accept Cash, M-Pesa (Till/Paybill), Credit Cards, and Invoice-to-Account payments.
- Peripheral Support: Direct integration with thermal receipt printers for instant customer billing.
- Shift Management: Track daily opening/closing balances and sales summaries per staff member.
8. CRM & Sales Tracking
Keep your customers engaged and your sales pipeline full.
Track customer purchase history, manage loyalty programs, and record sales leads from initial contact to conversion.
9. Support Help Desk
Direct access to Afriteck technical specialists via the built-in ticketing system.